Sunday 16 November 2014

How to draw hexagon maps

I've been having a lot of fun playing Warlock - Master of the Arcane. The game is absolutely fantastic and very underrated. It's also about a billion times more interesting and addictive than Civilization 5 (unless a fantasy setting really isn't your thing).

Playing Warlock though gave me a desire to make my own 3D Hexagon-based game. I decided to start out by making a map editor to draw the hexagon maps, and its development has forced me learn a lot of new things about hexagons and how to draw them.

1. Drawing Hexagons

There's many great articles out there on the internet about hexagons. The two I found most helpful are here and here. Although these pointed me in the right direction at times, I eventually had to solve it mostly on my own by treating the hexagons like overlapping squares.

This technique has the advantage of keeping the simple coordinate system of a square map, which I find highly desirable. This also means that hexagon map coordinates look like normal square map coordinates when saved.

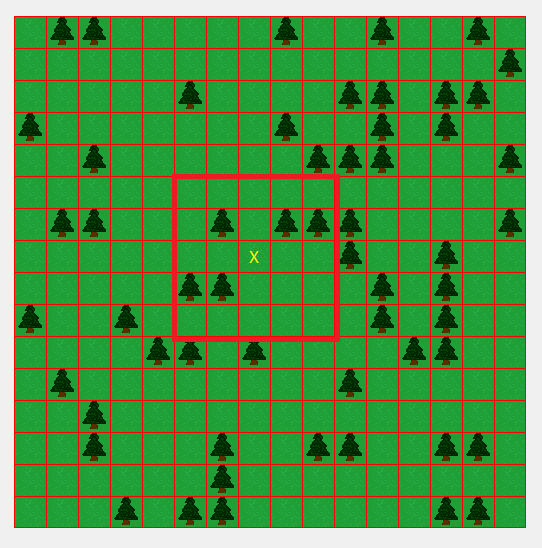
I'll begin by showing the basic concept before moving on to the maths behind this. Look at this simple square map here.

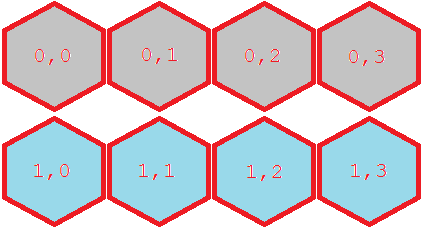
Now if we were to convert the squares directly into hexagons, it'd look something like this:

Keeping in mind that our hexagons are positioned like squares, the squares would look like this:


Unfortunately, the hexagons are positioned like they're squares. This isn't how a hexagon map should look like, but it's easily fixed. If we shift the bottom row slightly to the right, and then shift the bottom row slightly upwards then the hexagons line up nicely.

Now let's shift that bottom row to the right, and then upwards. The result will be something like this:


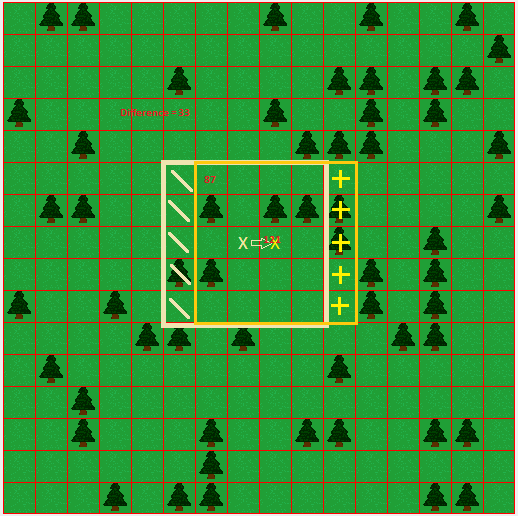
You've probably noticed that the overlapping squares form some interesting right angled triangles. Look closer and you'll notice that the opposite side of the triangle is exactly the length of the top left line of the hexagon, and that the bottom right corner of the triangle (where the 90 degree angle is) is also dead in the center between the two squares above it.

These pictures have hopefully shown you exactly how much the bottom row needs to be shifted in order to snap into place with the row above it. To summarise:
  1. Shift the bottom row to the right by exactly 50% of the width of a square.
  2. Shift the bottom row upwards by the length of the triangle's opposite side (you can figure this out by constructing a right angled triangle whose opposite side is the length of a side of your hexagon).
One final thing to mention is that every second row should be shifted like this, so you can test if the X coordinate of the tile is odd, and if it is, then shift the tile.

2. Saving a hexagon map

As mentioned above, saving a map like this is very easy. Simply save it as you would any square tiled map.


3. Result

I'm fairly certain that's all there is to mention regarding hexagon maps. To perform calculations such as figuring out if a user is clicking on a hexagon, you can again use the boxes to determine which tile is being clicked.

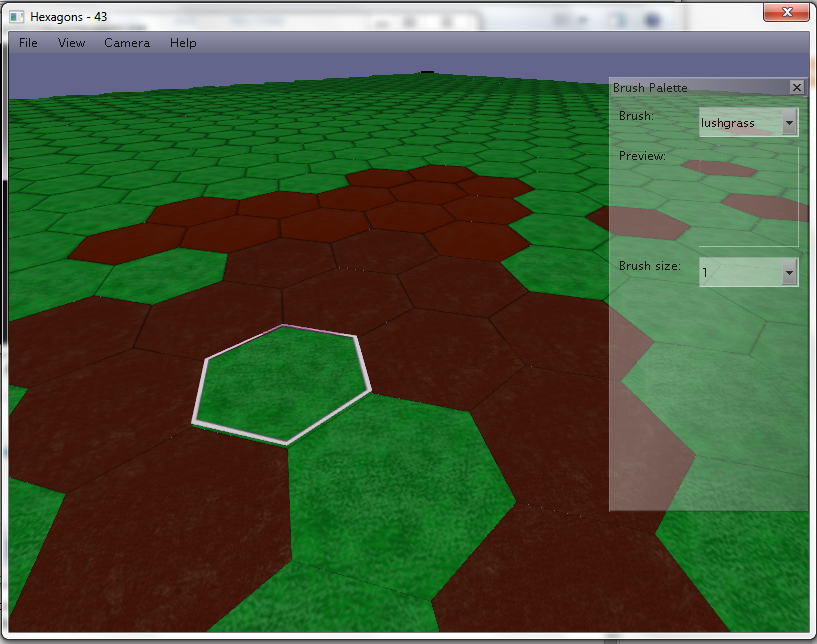
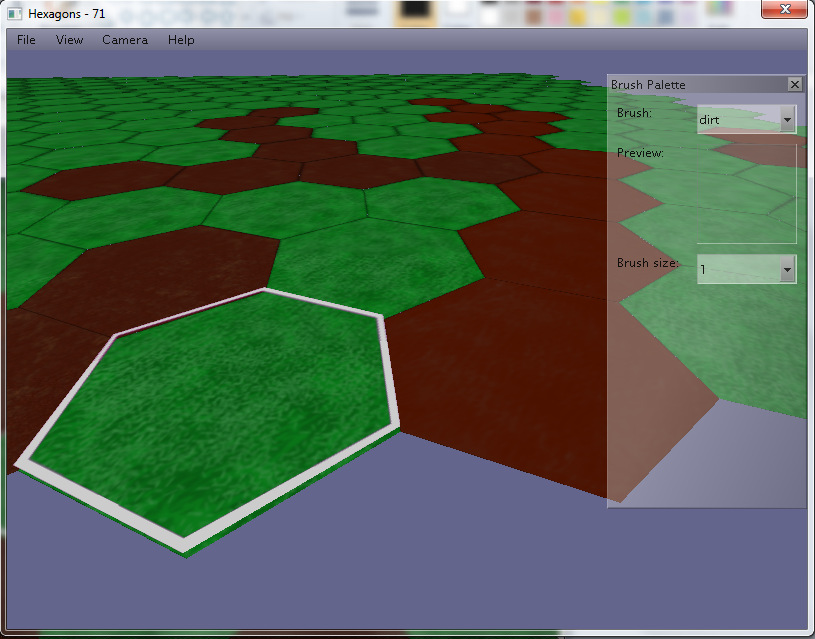
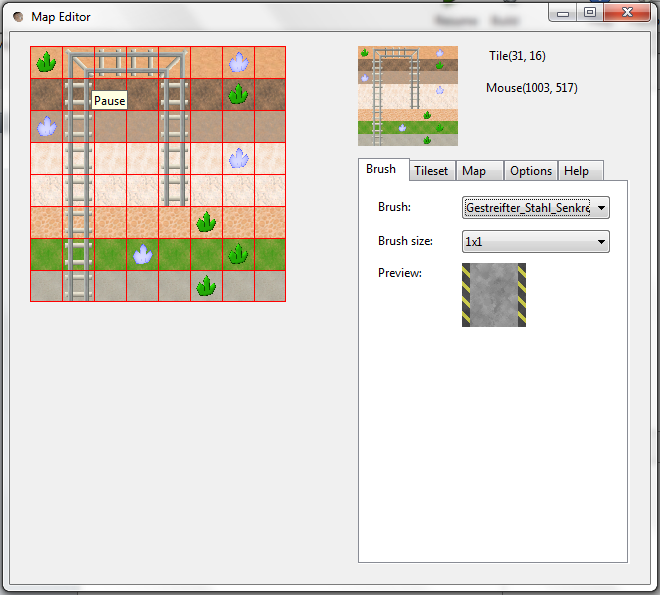
Here's a screenshot from my 3D map editor (which is nearly finished). It positions 3D hexagons like I've described in this post.


Sunday 27 April 2014

Event Queue (brainstorming)

This will probably be my last post for a few weeks. The week after next the school component of my German internship continues. I've been living in Germany now for about 13 months now, and while I can speak and understand enough German to get by it's still quite a challenge for me. Learning content intended for native German speakers in a German school when I'm someone who's just been learning German for about a year is taxing. Although this is certainly a great way to get better at speaking a foreign language, it unfortunately also means that I have too little time and energy to progress much with my gaming projects.

Anyway, back to the topic at hand: the Event Queue. Early on in my gaming efforts I noticed this need for some kind of queue. Especially when thinking about AI and keeping all the actions that the player and AI make in sync. Up until now I'd been messily getting by without this system but my Wanderer game has grown to the extent that I really do need to implement a queue system. The need for it is so paramount that it will be the next thing I do.

Now what this queue would do is allow me to do is queue up a bunch of actions to happen per game loop cycle. This means that instead of pressing the left arrow key and having the key handler call a method that moves the character west for me, the key event handler simply adds a movement order to the event queue. The event queue has units subscribed to it, and the event queue finds the right unit and informs it that it has been instructed to move. The main advantage of this for me now is that I then don't have to consider time when moving many different objects and characters. They will all move at the same rate because the event queue will ensure that they move at the same rate by only updating them once per game cycle. It also means that I can pause the game by issuing a hold on this queue for a specified time period or indefinitely.

There are more benefits to using queuing system but I've yet to realise and consider those. If you wish to read further I recommend this article. It explains the queue system but also much more. I would also suggest looking at an observer pattern. My understanding of a queue in a game is that it's an observer pattern that updates with every cycle of the game's loop.

After I've developed a prototype I'll write about it here to let you know if it was successful and I'll discuss more about it.

Friday 25 April 2014

The Wanderer - 2D Open World (prototype)

Three days ago I made a post about my plans on how to convert my 2D Wanderer game into an open world Wanderer. I'm writing here now to report that my plans have been successful, although there's still a few bugs left to iron out and I also need to optimise my functions so that there's less of a framerate drop when loading chunks.

I'm not convinced this is the best way to do it, but it's a first attempt and at least it works.

Anyway, here's how I did it. Of a much bigger world I establish a viewpoint into this world that's 1760x1760 pixels large. This is then divided into 9 sections arranged into a 3x3 grid:

123
456
789

The player is on chunk 5. If he moves onto one of the other chunks, then the chunks need to be rearranged. For example, if he's standing on 5 and moves to 6 then the following needs to happen:

Chunks 2 5 8 need to be moved back to chunks 1 4 7.
Chunks 3 6 9 need to be moved back to chunks 2 5 8.
Chunks 3 6 9 then need to be reloaded.

This creates an effect where if the player moves off chunk 5 then the world is rearranged so that he's again on chunk 5. Just like in this picture:


Here's some screenshots of my Wanderer in action. In this picture, he's just spawned at tile 64,64.


Now I turn the grid on, and the tile coordinates on, and walk east until I reach chunk 6 (which forces a shuffling and loading of chunks):


Then I walk against east, until a new chunk is loaded.


Here's another shot at a different location with the chunks coloured.


Anyway, it's an ok first attempt at getting an open world to work, but I've got problems with framerate and glitches to overcome before I label it as a success.

Tuesday 22 April 2014

The Wanderer - 2D Open world (Brainstorming)

This week I put together a little game called "The Wanderer". It loads a map created with my map editor and you're given control over a beetle that can walk around on the map. At the moment he's confined to his little map, but what I want to do is expand this to be an open world wanderer. This is my article about my solution to this open world problem.

The open world idea presents new challenges for me, but I have a plan about how I can do it. I generated a rather giant map (65536 tiles). It's really only feasible to have about 4096 tiles loaded at one time, which equates to an image of 2048x2048 with a size 32 tile. Anything more and loading times begin to become longer, and an image size of 2048x2048 is larger than what can fit on an average monitor - providing ample space.

My challenge is that of the 65536 tiles in this giant map, I can only ever have 4096 tiles loaded at a time. As the player moves, tiles need to be dynamically loaded and unloaded to maintain this small drawn window of the large world. I'm going to refer to these 4096 tiles as a chunk.

To figure out which tiles need to load/unload, I have to first take the tile that the player is standing on, and then calculate all the tiles around the player that fall within perimeter, determined by this chunksize.

Solution

My solution is simple, but untested. I will implement it and then report whether it works or not, but in theory, it should work.

The solution is that we know the tile that the player is standing on, and we know the size of the chunk. Therefore, the top left and bottom right tiles in the chunk can be predicted like this:

The amount of tiles behind and before the player's tile: Difference = (chunksize - 1) / 2
Therefore:
Top left tile in chunk = PlayerTile - Difference
Bottom right tile in chunk = PlayerTile + Difference

With these values I can determine which tiles to load into the new chunk whenever a player moves to a new tile. I have a visual representation of this below (sorry about the MSPaint.exe style quality). In this example, the chunk size is 25. X represents the player's tile and the big red box represents the chunk.


In this next image, the player walks one tile to the right. You can see drawn the tiles that need to be unloaded, and the tiles that need to be loaded.


Finally, based upon the player's tile and the chunksize, I learn can predict the indexes of the tiles to be loaded.


This is my open world strategy. It should work. If you have a better idea, please let me know in the comments.

Saturday 22 March 2014

How should a game work? (Brainstorming)

There's not really a whole lot of stuff out there (if there is, I can't find it) about how to put together a game. Unfortunately this post isn't so informative. It's a brainstorming post where I try to plan how I should go about designing something. That means that you shouldn't expect to find too many pearls of wisdom in this post. This is me trying to figure something out, not me offering a brilliant solution.

At the heart of it the game is just an endless loop that says:

1. Handle user input
2. Process AI
3. Update game values
4. Draw graphics

The loops vary and can be more or less sophisticated depending on how you decide to make it. I'm not going to talk about this loop beyond what I've said already because someone else a lot more knowledgeable about the topic has already made a great write-up about it. I already have my own crude game loop figured out. At the moment I'm more concerned about how best to organise what happens inside point  #4. I'll give the other steps a brief mention, however.

#2 AI
The AI is an entirely different problem that I'll cover in the future. At the moment I have simpler things to consider. If you take all the complexities aside and think about what the AI step should actually do, it's just a whole heap of calculations to determine the positions of units and what they're doing.

#3 Update game values
This is also something I've decided to leave for the future because I haven't thought about it enough in detail yet. Basically this is just the part where we determine if units are still doing something. This step might even be merged into the AI step because they'er related. An example of this is soldiers shooting a building. If the soldiers are still in range to shoot at the building then the building needs to be losing health, for example.

#4 Draw graphics
Anyone can draw some graphics. The difficulty comes with figuring out what to draw. Some kind of system is needed that keeps track of all the sprites in the game and draws them when needed. This system needs to:

a) Unit & Building sprites list
The best way I can think of to draw all the sprites is to add them to a big list of sprites to draw. If a player makes a new soldier, this soldier sprite is appended to the list and subsequently drawn. If this soldier dies, then he needs to turn into a corpse sprite for a while before disappearing entirely (or I could leave him there as a permanent stain upon the battlefield, which is also cool). In any case, the very first thing #3 should do is draw everything in this list and figure out a good way to add & remove sprites from this list. This list shouldn't be a simple array, but something more intelligent like a vector/dictionary.

There should also be another list that will be drawn after the list I just described, and this is the effects list. So explosions, fire, smoke, rain and whatever else should be drawn here.

b) Draw from the perspective of the player
In an RTS game this means that the player can only see his own units, and also see whatever is in the light of sight of the player's units. I think the easiest approach to this is to go for the fog of war type of thing where everything is drawn and then a layer of fog goes over the top, shrouding everything that shouldn't be visible from sight. This gives me then the simplicity of being able to draw everything onto the map, then selectively reveal parts of the map to the player instead of selectively drawing only based upon what a player should be able to see.

There's two styles of fog. The first is to have a completely black map which you have to explore thoroughly or else you see nothing. The second is to have a grayed out view of the entire map, but you can still see features of the map - just none of the units or buildings. The former was much more common in older games like Warcraft 2, Starcraft, Age of Empires and C&C: Tiberian Sun. The latter is basically the 'status quo' of all modern RTS games and features in basically everything. I haven't seen the old style fog of war in years.

The question is, which should I use? It'd make more sense to go with the latter in some ways because of the modern setting of the game. It seems quite silly that a space-fighting force couldn't do a simple radar scan of the map to determine its terrain features before landing. Although not at all related to the fog of war, one game had a very cool feature, in my opinion, that is deserving of a special mention. In C&C: Tiberian Sun the minimap was actually disabled until you built a radar structure. This means that you could only have a minimap if your radar structure was functioning. I might go with this idea and put it in my game because it actually makes a lot of sense and is quite a cool idea.

Concluding #4
That should be enough planning for me to get started on the next part of my little game project: The sprite list and the fog of war.

Sunday 16 March 2014

Tile "layers" for the Mapeditor

I'd been wondering about a problem for a while now, and didn't quite know how to solve it. Luckily Alycthul gave me an idea: layers.

What I've now done is modified the map format to allow for a tile to have an 'occupant'. An occupant is a tile that sits on top of another tile - forming a type of layer. For the sake of comparison here's a saved tile from both the old and the new formats:

Old
  x,y=id;
  0,0=1;

New
  x,y=id,occupant_id:tile_space_occupied;
  0,0=1,1301:1;

As you will know if you read my previous map editor posts the 0,0 represents a tile's coordinate and the 1 is the tile's ID. In the new format this is still here, but there's now a comma and then an additional value (1301 here). This is the occupant. The third value is the occupying space. I'm not entirely sure how to implement this yet, but it basically means how many tiles the occupant stretches over (in the case of a building or larger in-game unit). Currently this doesn't work and so all occupant sizes are treated as 1.

Tile occupants will typically be buildings, units or resources. This allows a unit or building to be placed as an occupant onto any sort of tile. Here's a screenshot of this in action:


As you can see here the crystals and train tracks are occupants of the other tiles. If you have any suggestions or questions feel free to leave a comment.

Saturday 15 March 2014

Programming Gravity

One of these days I'd really like to make a universe simulator. The kind of thing where you could create a whole heap of planets and stars and watch them collide and orbit each other. A couple of weeks ago I thought I'd have a crack at programming some gravity. I did a little of my own research and then I contacted a friend of mine who studied physics and we put together some formulas.


The experiment went well. I made a simple GUI application with two buttons and applied the laws of the universe to these buttons. They began to gravitate towards each other. I felt very empowered, because even though all I'd done is made a couple of buttons gravitate towards towards each other, I'd also created a universe in my computer. I'm going to share a bare-bones example here which details only the maths behind it all.

There's several things to consider when doing this. First of all, you need a position structure. This should include either X and Y or X, Y and Z:


typedef struct {
  double x;
  double y;
  double z;
} position_t;

This structure represents a position in 2d or 3d space. Then you need a function to calculate the distance between two points. Depending on whether you want your universe to be 2d or 3d, you'll need the appropriate function. I made both anyway, even though my universe was 2d:

double distance2d(position_t *a, position_t *b)
{
  
  return sqrt( pow((b->x  - a->x), 2) + pow((b->y  - a->y), 2) );
  
}

double distance3d(position_t *a, position_t *b)
{
  
  double xd, yd, zd;
  xd = b->x - a->x;
  yd = b->y - a->y;
  zd = b->z - a->z;
  
  return sqrt( (xd*xd) + (yd*yd) + (zd*zd) );
  
}

Square roots are accurate but slow. If you wanted to calculate the distance faster but less accurately, there are other techniques around. Speed wasn't an issue for my experiment.

Next you need a class or structure to represent an object in space. This structure should contain the mass of the object, its position, its acceleration and its velocity. All of these variables are required to calculate the gravitational pull.

typedef struct {
  position_t position;
  double mass, velocity, acceleration;
} object_t;

With two of these objects created and distanced apart you can then make them gravitate toward each other in the next step. My example here is simple and only takes into account the X axis.

int main()
{
  
  position_t a = { 0, 0, 0 };
  position_t b = { 10, 10, 10 };
  
  // establish our two bodies
  object_t bodya = { a, 999999999, 0, 0 };
  object_t bodyb = { a, 444444444, 0, 0 };
  
  // press enter to go forwards, or q to quit
  while(getch() != 'q')
  {
    
    // calculate the distance between the objects
    double d = distance2d(&a, &b);
    
    // calculate the force
    double f = (6.67 * pow((1*10), -11)) * (bodya.mass * bodyb.mass)/pow(d, 2);
    
    // calculate the acceleration
    bodya.acceleration = f/bodya.mass;
    bodyb.acceleration = f/bodyb.mass;
    
    // calculate the velocity
    bodya.velocity += bodya.acceleration*1;
    bodyb.velocity += bodyb.acceleration*1;
    
    // calculate the position
    bodya.position.x += bodya.velocity;
    bodyb.position.x += bodyb.velocity;
    
    printf("Body A:\n\tPosition: x(%lf), y(%lf)\n\tVelocity: %f\nBody B:\n\tPosition: x(%lf), y(%lf)\n\tVelocity: %f\n",
      bodya.position.x, bodya.position.y, bodya.velocity,
      bodyb.position.x, bodyb.position.y, bodyb.velocity);
    
  }
  
  return 0;
  
}

I'm not a physicist, so maybe there are some errors in my calculations. But I'm quite certain that this is correct. It'd certainly seem so based off the numbers.